

How To Stripe A Parking Lot: Layout, Tools, Straight Lines
Fresh parking lot stripes do more than make a property look clean, they direct traffic, maximize parking capacity, and reduce liability risks. Whether you’re a facility manager considering a DIY approach or exploring what professional striping involves, understanding how to stripe a parking lot gives you the knowledge to make better decisions for your property. At Denver Snow & Commercial Property Services, we’ve handled parking lot striping across the Denver metro since 1983, and we’ve seen firsthand how proper technique separates a crisp, lasting result from faded lines that need redoing within months.
This guide walks you through the full process: layout planning, equipment selection, surface preparation, and the techniques that produce straight, durable lines. You’ll learn what materials hold up to Colorado’s freeze-thaw cycles, how to calculate paint quantities, and the step-by-step methods professionals use. By the end, you’ll have a clear picture of the work involved, and whether tackling it yourself or hiring a crew makes the most sense for your situation.
What you need and when to DIY vs hire
Learning how to stripe a parking lot starts with understanding what equipment you’ll actually use and whether your project fits a do-it-yourself scope. Small parking areas with simple layouts often suit property owners willing to invest a weekend, while multi-acre lots with complex traffic patterns demand professional crews and specialized machinery. The decision hinges on lot size, condition, and your comfort with detail-oriented work that directly affects safety and compliance.
Essential equipment and materials
You need traffic paint rated for pavement (water-based acrylic or solvent-based alkyd), a line striper machine (walk-behind or ride-on), measuring tape, chalk line, stencils for symbols, and masking tape for crisp edges. Alkyd paint lasts longer but costs more and requires mineral spirits for cleanup, while acrylic dries faster and works better in temperatures above 50°F. A 5-gallon bucket of quality traffic paint covers roughly 500 to 700 linear feet at 4-inch width, so a 50-space lot typically requires 10 to 15 gallons depending on double-line configurations. You’ll also need safety cones, barricades, and weather-resistant stencils for ADA symbols and arrows.
Professional-grade line stripers produce sharper lines than DIY push models, but equipment rental for a weekend runs $150 to $300 depending on machine type.
DIY projects vs professional jobs
Tackle striping yourself if you manage a small lot with fewer than 20 spaces, a flat surface, and straightforward 90-degree parking stalls. Projects requiring angled stalls, loading zones, or high-traffic commercial layouts benefit from professional expertise, especially when ADA compliance, curb painting, and liability documentation matter. Professionals also bring boom trucks for fire lanes, thermoplastic application for crosswalks, and knowledge of local codes that vary by municipality. If your asphalt needs repair or sealcoating before striping, coordinating multiple contractors adds complexity that often justifies hiring a full-service crew from the start.
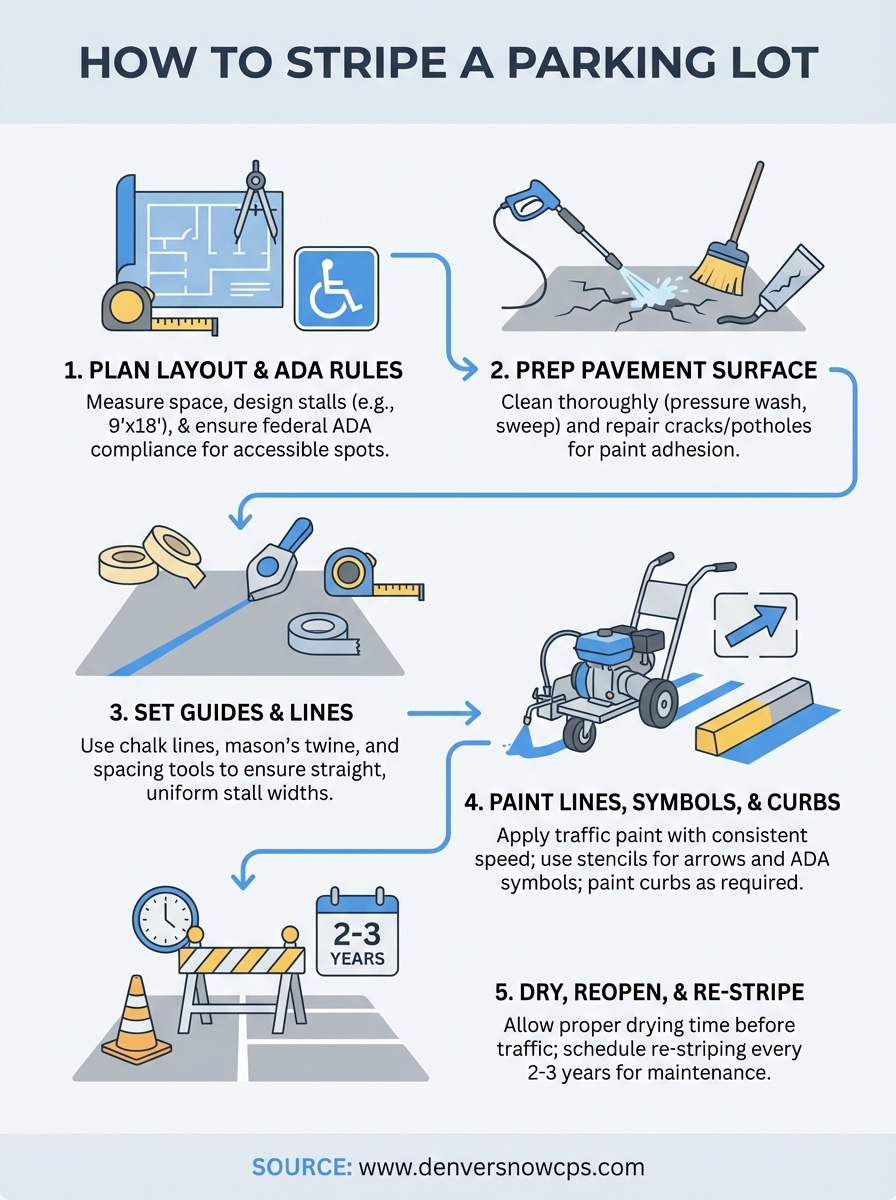
Step 1. Design the layout and check ADA rules
Understanding how to stripe a parking lot requires planning before you touch paint. You start by measuring your entire lot, noting existing curbs, light poles, and drainage, then sketching a scaled layout that maximizes usable spaces while meeting code requirements. This phase determines whether your finished product functions properly or creates bottlenecks, liability risks, and wasted square footage.
Measure and calculate stall dimensions
Standard parking stalls measure 9 feet wide by 18 feet deep, though compact spaces run 8 feet by 16 feet in some municipalities. You measure the lot length and width, subtract drive aisle space (typically 24 feet for two-way traffic), and divide the remaining area into rows. Angled stalls (45 or 60 degrees) increase capacity but require wider aisles, usually 13 to 18 feet depending on angle. Mark these dimensions on graph paper or use parking lot design software to visualize traffic flow before committing to paint.
ADA requirements you must follow
Federal law mandates accessible parking based on total capacity: one accessible space for lots with 1 to 25 spaces, two for 26 to 50 spaces, and additional spaces as totals increase. Each accessible stall requires 8 feet of width plus a 5-foot access aisle (or two stalls sharing an 8-foot aisle), marked with diagonal hatching and proper signage. Van-accessible spaces need 11 feet of width, and you must position these closest to the facility entrance with compliant curb ramps connecting to walkways.
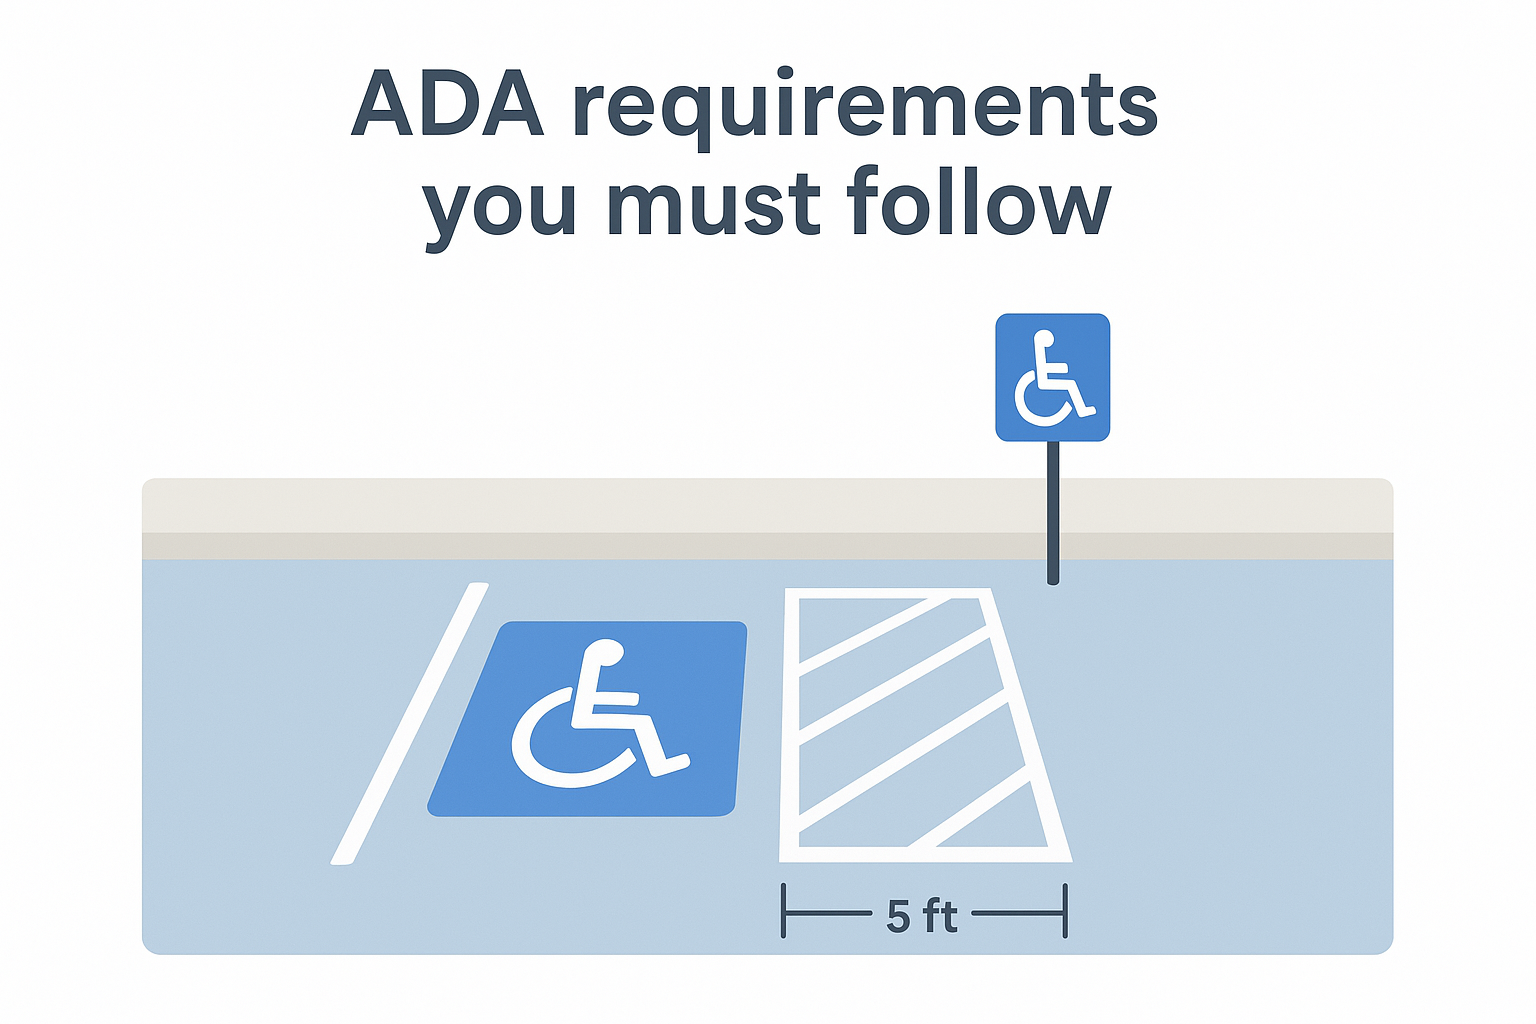
Violations of ADA parking rules carry fines up to $75,000 for first offenses and expose your property to lawsuits.
Step 2. Prep asphalt or concrete for lasting lines
Surface preparation determines how long your striping lasts, with clean, sound pavement holding paint for two to three years while dirty or damaged surfaces fail within months. You create adhesion by removing every barrier between paint and pavement, then fixing structural issues that cause lines to crack or peel. Skipping this step wastes money on paint that won’t bond properly, and learning how to stripe a parking lot means accepting that prep work consumes more time than the actual striping.
Clean the surface thoroughly
Power wash the entire striping area at 3,000 PSI minimum, focusing on oil stains, tire marks, and dirt buildup that prevent paint adhesion. Oil spots require degreaser applied 15 minutes before washing, and you must let the surface dry completely for 24 to 48 hours depending on humidity. Sweep away loose debris, then blow compressed air across the pavement to clear dust from pores where paint needs to grip.
Repair cracks and holes first
Fill cracks wider than 1/8 inch with rubberized crack filler, and patch potholes with cold-patch asphalt compacted flush with surrounding pavement. Paint applied over damaged surfaces cracks along the same lines, creating a messy appearance that broadcasts neglect rather than professionalism. Allow repairs to cure per manufacturer specifications before proceeding, typically 24 hours for crack filler and 48 hours for patch material.
Paint bonds to clean pavement at molecular level but sits loosely on contaminated surfaces, peeling within weeks of application.
Step 3. Set guides for straight, consistent stalls
Straight lines separate professional striping from amateur work, and you achieve them through physical guides that eliminate guesswork during application. Mastering how to stripe a parking lot means spending extra time on this setup phase, because your striper machine simply follows the path you establish. You create reference points that keep every line parallel and properly spaced, preventing the drifting angles and width variations that make parking lots look sloppy.
String lines and chalk marks
Snap chalk lines across your first reference point, typically along the longest straight edge of your lot like the building face or curb line. Measure out your stall width (9 feet standard) from this baseline, then snap parallel chalk lines for each parking space boundary. For multiple rows, stretch mason’s twine between stakes hammered at each end of the lot, creating temporary guidelines that hover 2 inches above pavement. You’ll follow these strings with your striper wheel, maintaining consistent spacing across the entire row.

Use spacing tools for uniform width
Professional crews attach measuring bars or guide wheels to striping machines, automatically maintaining 4-inch line width throughout application. You verify spacing between stalls by measuring at three points along each row (beginning, middle, end), adjusting chalk lines if measurements vary by more than half an inch. Mark perpendicular lines for stall depths every 18 feet, creating a grid that ensures rectangular spaces rather than trapezoids that waste area and confuse drivers.
Crooked lines force you to repaint the entire section, tripling your material cost and labor time.
Step 4. Paint lines, symbols, arrows, and curbs
You apply paint by walking steadily behind your striper machine, maintaining consistent speed to create uniform line thickness from start to finish. Understanding how to stripe a parking lot means controlling variables like temperature, humidity, and application rate, all of which affect how paint flows and dries. You start with perimeter lines and work inward, painting stall boundaries before adding symbols, arrows, and curb markings that complete the visual hierarchy drivers need to navigate safely.
Apply paint with consistent speed
Walk at two to three feet per second while squeezing the striper trigger, keeping the spray tip four to six inches above pavement for optimal coverage. You maintain this pace throughout each line to prevent thick blobs at stopping points and thin patches where you accelerate. Test your speed on cardboard first, adjusting machine pressure until you see solid, opaque coverage without runs or drips.
Inconsistent walking speed creates lines with visible thickness variations that look unprofessional and wear unevenly.
Add stencils and markings
Position ADA symbol stencils in designated accessible spaces, securing edges with tape to prevent paint bleed. You spray or roll paint through stencil openings, then immediately lift the template to avoid smudging. Paint directional arrows in drive aisles, fire lane curbs in red or yellow per local code, and loading zone hash marks using the same controlled application technique that produced your straight parking lines.
Step 5. Dry, reopen, and plan re-striping
You protect fresh lines by controlling traffic until paint cures completely, which means planning reopening times based on temperature, humidity, and paint type you applied. Understanding how to stripe a parking lot includes knowing that premature vehicle traffic smears lines, embeds tire marks, and forces expensive touch-ups. You schedule this final phase around weather conditions and property use patterns, ensuring your investment in materials and labor produces the two-to-three-year lifespan quality striping delivers.
Allow proper drying before traffic
Water-based paint requires 30 to 60 minutes of dry time before foot traffic and two to four hours before vehicles when temperatures stay above 70°F. Solvent-based paint needs one to two hours for walking and four to six hours for driving, with colder temperatures doubling these windows. You test dryness by touching paint lightly in an inconspicuous spot; if no residue transfers to your finger, foot traffic won’t damage the surface.
Vehicles driving over wet paint create permanent tire tracks that require complete repainting to fix.
Schedule routine re-striping
Plan re-striping every 24 to 36 months for standard traffic lots, or annually for high-volume areas like retail centers and hospitals. You inspect lines twice yearly for fading, checking that stall boundaries and ADA symbols remain clearly visible from 50 feet away. Document your striping dates and paint type used, creating a maintenance record that helps predict when your next refresh will deliver optimal appearance before deterioration becomes noticeable.
Quick recap
Learning how to stripe a parking lot requires planning your layout against ADA requirements, preparing clean pavement for proper adhesion, and maintaining consistent speed during application. You measure stalls at 9 by 18 feet, snap chalk guidelines for straight lines, and apply paint when temperatures stay above 50°F with low humidity. Quality traffic paint and proper technique produce stripes that last two to three years before requiring touch-ups, while rushed work on unprepared surfaces fails within months and creates safety liability.
Denver Snow & Commercial Property Services handles parking lot striping across the metro area, bringing 40 years of experience to projects where liability protection and professional appearance matter most. Our crews understand Colorado’s weather challenges and local code requirements, ensuring your property stays compliant and accessible year-round. Contact Denver Snow & Commercial Property Services to schedule an assessment for your commercial property and receive a detailed quote for striping that holds up through Denver’s freeze-thaw cycles.


